A small leak can turn into a major structural problem faster than you’d expect. You need to act quickly: stop the water source, remove standing water, open damp materials, and push air through the area with fans and dehumidifiers. The real challenge is drying hidden spaces before mold starts, and that’s where the right sequence matters most.
Key Takeaways
- Stop the water source immediately and call a professional if the leak is hidden or uncontrolled.
- Remove standing water fast using pumps, wet vacs, and extractors, then open baseboards or trim for hidden moisture.
- Maximize airflow with fans and dehumidifiers, and keep cords safe while drying all wet surfaces.
- Monitor moisture daily with meters, borescopes, or thermal cameras until readings stabilize and hidden cavities are dry.
- Clean and disinfect affected areas thoroughly, maintain humidity below 60%, and watch for mold, warping, or structural damage.
Find the Leak and Stop It
Start by tracking down the source of the water intrusion and stopping it immediately, because structural drying won’t be effective until the leak is controlled.
Use leak detection methods to trace moisture paths, inspect ceilings, walls, and flooring, and check fixtures, supply lines, and shutoff valves. A focused plumbing inspection helps you catch cracked fittings, loose connections, and hidden pipe failures before they spread damage.
If you can’t isolate the source, call a qualified pro fast so your team can move forward with confidence. You’ll protect the structure, reduce repair costs, and keep the drying process efficient.
Once you’ve stopped the leak, document the affected area and confirm no active dripping remains. That’s how you take control and stay ahead together.
Remove Standing Water Fast
Get the standing water out as quickly as possible, because every minute it sits there increases the risk of swelling, warping, mold growth, and deeper material saturation.
You should start with proven water extraction techniques: use a wet vac, pump, or weighted extractor to pull water from floors, carpets, and low spots. Work from the outside in so you don’t spread the problem, and empty equipment often to keep suction strong.
If you’re in a response crew or handling this yourself, follow emergency response tips: shut off affected power, wear protective gear, and move water away from structural pathways fast. You’re protecting your space and helping the whole team stay ahead of secondary damage.
Finish by checking for hidden puddles along edges, under furnishings, and in corners where moisture likes to linger.
Open Wet Walls and Floors
Open wet walls and floors by removing baseboards, trim, and affected finish materials so you can expose wall cavities and floor layers.
This lets you inspect hidden moisture, speed evaporation, and target the materials that need drying.
You should also create clear airflow paths through the structure so dehumidified air can move across wet surfaces efficiently.
Open Wall Cavities
When you expose wet wall cavities or floor assemblies, you can dry them far more effectively by giving air a direct path into the structure.
Start with insulation removal so trapped moisture doesn’t linger against framing. Check for damaged moisture barriers, because torn poly or paper backing can keep materials wet and slow recovery.
Then position air movers to sweep through the cavity, not just across the room, and use dehumidification to pull vapor out of the air you’re circulating.
You should also monitor wood moisture content so you know when conditions are returning to normal.
Keep the cavity open until readings stabilize, then close it only after materials are dry enough to avoid hidden mold growth and recurring damage.
Expose Floor Layers
After you remove finish flooring, underlayment, and any wet sublayers, you can dry the assembly much faster by exposing each material to moving air.
During floor inspection, you’ll confirm whether the subfloor, joists, and adjacent framing stayed sound. Use layer identification to map each material so you know what needs removal, cleaning, or monitoring.
You’re not just opening a floor; you’re protecting the structure your team depends on.
- Lift saturated sections cleanly.
- Separate materials by type.
- Label anything you’ll reinstall.
This approach lets you track moisture in each layer and prevent trapped water from lingering in hidden pockets.
When you work methodically, you’ll fit in with crews that dry buildings the right way: with discipline, accuracy, and respect for the assembly.
Maximize Airflow Paths
To speed structural drying, you need to create direct airflow paths by opening wet wall and floor assemblies where materials can safely come apart.
Remove baseboards, drill weep holes when appropriate, and lift carpet, padding, or affected finishes so air can reach hidden cavities.
Use airflow optimization to guide air movers along each open channel, not across blocked surfaces. Pair this with targeted ventilation techniques, including controlled exhaust and dehumidification, to pull moisture out instead of recirculating it.
You’ll dry faster when you keep pathways clear, avoid dead zones, and verify that air enters and exits the assembly.
Work methodically, document openings, and restore components only after readings confirm stable dry conditions. That’s how your team stays efficient and aligned.
Increase Airflow With Fans
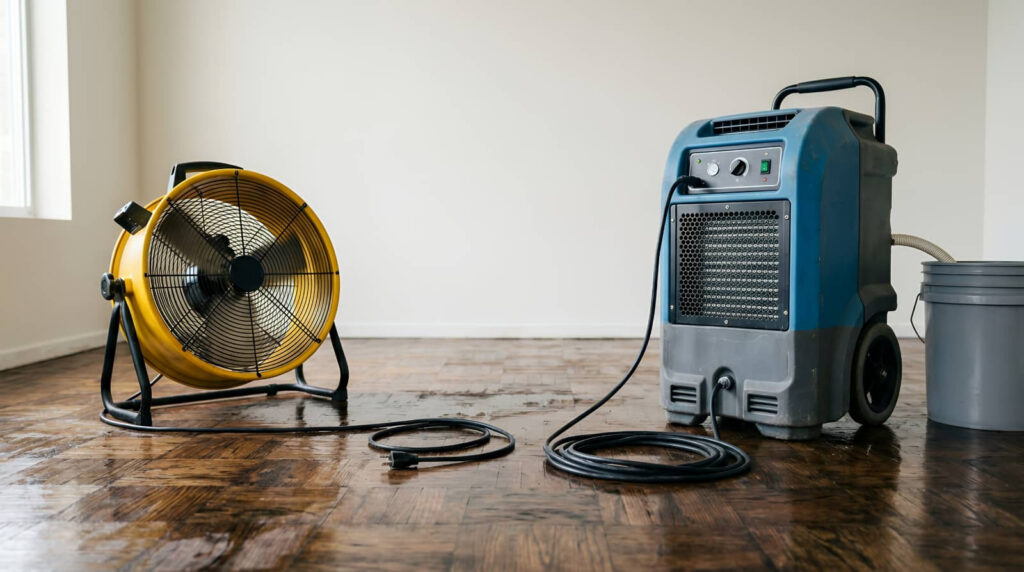
Fans can dramatically speed structural drying by moving stagnant air across wet surfaces and into concealed cavities. You should treat fan placement as a controlled process, not guesswork. Aim each unit to sweep across damp materials, then overlap streams so dead zones don’t form.
Smart airflow strategies help you protect the team’s shared goal: a faster, safer dry-out.
- Place fans low for floors and baseboards.
- Angle them to push air through doorways and wall openings.
- Reposition units as surfaces dry to keep momentum.
Keep cords clear, secure equipment, and verify that you’re not blowing debris into vulnerable areas.
With consistent adjustments, you’ll build strong drying progress and stay aligned with the standards your crew expects.
Use Dehumidifiers to Dry the Structure
Once airflow is moving across the wet areas, you need to remove that moisture from the air with dehumidifiers.
Choose the right dehumidifier types for the space: refrigerant units work well in warm, humid rooms, while desiccant models perform better in cooler conditions.
Place the unit close enough to capture damp air, but keep intake and exhaust clear so it can run efficiently. Set the equipment to ideal settings that favor aggressive moisture removal without overcooling the structure.
You’ll protect materials, reduce drying time, and support a controlled environment that helps your team stay on track.
Seal the area as much as possible, and use enough capacity for the room size so your drying plan works as one coordinated system.
Check Moisture Levels Every Day
Check moisture levels every day so you can confirm the structure is actually drying, not just feeling drier on the surface. With consistent moisture monitoring, you’ll spot stalled areas fast and keep your drying plan on track.
Your daily assessments should include the same rooms, materials, and reading points each time, so you can compare results accurately and act with confidence.
- Record meter readings at the same time each day.
- Compare values against your target drying baseline.
- Adjust equipment settings only when readings justify it.
When you stay disciplined, you protect the whole team’s progress and avoid guesswork. You’re building a reliable routine that helps everyone involved stay aligned, efficient, and ready to finish strong.
Dry Hidden Spaces Before Mold Starts
After visible surfaces start drying, you still need to dry hidden cavities, because trapped moisture in wall voids, under flooring, behind baseboards, and inside cabinets can become a mold problem fast.
You should open access points, run air movers toward voids, and use dehumidifiers to pull vapor from the structure.
Check insulation, framing, and subfloor edges for hidden moisture with a meter, and keep monitoring until readings stabilize.
Don’t seal materials too soon; they can hold water longer than you think.
For early detection, inspect with a borescope or thermal camera when available.
You’re protecting the whole team’s space when you dry these areas thoroughly, because shared standards prevent surprises, reduce callbacks, and keep restoration on track.
Clean and Disinfect Wet Surfaces
You should remove all surface contaminants first, because dirt and residue can block proper drying and reduce disinfectant performance.
Then apply the disinfectant thoroughly to every wet surface, following the required contact time so it can work effectively.
This step helps prevent mold regrowth and supports a cleaner, safer structural drying process.
Remove Surface Contaminants
Before you begin drying, remove surface contaminants from all wet materials and hard surfaces to limit microbial growth and secondary damage. Use surface cleaning as your first control step, because contaminant removal helps you restore a safer, more manageable work area fast.
You’ll protect your crew and keep the job on track when you follow a consistent sequence.
- Remove standing debris and loose soil with disposable towels.
- Wipe hard surfaces with clean cloths, changing them often.
- Bag contaminated waste promptly to avoid spread.
Focus on high-touch areas, baseboards, framing, and equipment exteriors. Work from cleaner zones toward dirtier ones so you don’t reintroduce residue.
If you stay disciplined now, you’ll support the whole drying process and fit right in with best-practice restoration teams.
Apply Disinfectant Thoroughly
Apply a disinfectant that’s appropriate for the affected materials and follow the label contact time so it can do its job on wet surfaces. You’ll protect the crew’s work when you choose disinfectant types matched to the material and soil load.
Read the label, confirm dilution, and apply with controlled application techniques such as low-pressure spray, microfiber wipe, or saturation of nonporous surfaces. Keep the surface visibly wet for the full dwell time; if it dries early, reapply.
Work in sections so you don’t miss edges, seams, or fasteners. Wear the right PPE and maintain ventilation while you work.
When you finish, inspect the area for complete coverage and consistent contact so your team can move forward with confidence and a cleaner, safer structure.
Prevent Mold Regrowth
Once the wet surfaces are disinfected, keep mold from taking hold by cleaning away remaining soil and moisture as fast as possible. You need to scrub porous-looking residue, then rinse and dry the area completely to support mold prevention strategies.
Use effective cleaning methods that match the material, such as detergent on hard surfaces and disposable cloths on contaminated finishes. Work from the cleanest zone outward so you don’t spread spores back into treated spaces, and replace wipes often.
- Remove standing water immediately.
- Ventilate the room with fans and dehumidifiers.
- Inspect corners, seams, and hidden cavities.
When you stay consistent, you help protect your team and your property. Fast cleanup, verified dryness, and routine checks give mold fewer chances to return, and that’s how you keep the space safe and ready for use.
Prevent Mold Growth After Drying
Even after the visible moisture is gone, you still need to control humidity and inspect hidden cavities, because mold can start growing in damp materials within 24 to 48 hours.
Keep indoor relative humidity below 60%, run dehumidifiers, and verify that framing, insulation, and subfloors are fully dry.
Use moisture meters on baseplates, wall voids, and flooring seams so you don’t miss trapped moisture.
Apply mold prevention strategies by cleaning surfaces, removing wet debris, and improving airflow with fans and open pathways.
Follow effective drying techniques that match the material, and keep monitoring for condensation around windows, HVAC ducts, and cool surfaces.
When you stay disciplined here, you protect the structure and your team’s standards.
When to Call a Water Damage Pro
If you see sagging floors, warped framing, or cracked drywall, you should call a water damage pro right away.
Severe structural damage can spread quickly and compromise load-bearing materials before surface drying shows the full extent of the problem.
A professional can locate hidden moisture behind walls, under flooring, and in cavities where standard drying methods can’t reach.
Severe Structural Damage
When water has soaked load-bearing walls, sagging ceilings, warped floors, or damaged electrical systems, you need a water damage pro right away. Severe water damage can compromise structural integrity fast, so act like your crew depends on it.
A trained pro will run a moisture assessment, protect you with safety precautions, and choose repair strategies that fit the affected building materials.
- Stabilize the area and shut off power
- Document damage for insurance claims
- Use proven restoration techniques before demolition
You don’t want guesswork here. Professional drying, removal, and rebuild work keep your home safer and help your team restore it correctly.
When the damage reaches framing, subfloors, or wiring, you’re not just drying space—you’re protecting the structure you live in.
Hidden Moisture Risks
Not all water damage shows itself right away. You may miss hidden leaks behind walls, under flooring, or above ceilings, yet moisture detection tools can reveal water intrusion early.
Check humidity sources like vents, crawl spaces, and plumbing chases, because trapped moisture can weaken building materials and compromise structural integrity.
If you notice musty odors, warped trim, staining, or insulation issues, act fast. These signs often mean moisture is spreading where you can’t see it, and air quality can drop as mold grows.
Call a water damage pro when you suspect concealed saturation, repeated leaks, or no clear drying path. You’ll protect your home, your comfort, and your crew’s shared standard for a safe, dry space.
Frequently Asked Questions
How Do I Know if Drywall Needs Complete Replacement?
You need complete replacement if your drywall sags, crumbles, stains persist, or mold spreads after a drywall inspection and moisture assessment. If damage reaches the core, you can’t dry it safely; replace it.
Can Hardwood Floors Be Saved After Flooding?
Yes, you can often save hardwood floors after flooding, if you act fast. In the flooding aftermath, you’ll need hardwood restoration, moisture checks, and controlled drying so you can protect your home and belong safely again.
What Insurance Documentation Is Needed for Water Damage Claims?
You’ll need photos, repair estimates, a damage inventory, receipts, mitigation records, and your policy details to support the claim process and verify insurance coverage. Keep dated notes, labels, and contractor reports so you stay organized together.
How Long Does Structural Drying Usually Take?
You’ll usually need 3-5 days for structural drying, though drying factors like saturation and materials can extend it. You’ll speed progress with proper drying methods, monitoring, and dehumidification, keeping your team informed.
Are Certain Building Materials More Likely to Trap Moisture?
Yes—certain building materials do trap moisture more readily, much like a hidden sponge. You’ll see higher moisture retention in wood, gypsum, and insulation than in concrete or metal, so you should dry and inspect them quickly.
Wrap-Up
In the end, you can treat structural drying like a spectator sport, but your walls won’t. Find the leak, stop it, and remove standing water fast. Open wet cavities, run fans, and use dehumidifiers until humidity stays below 60%. Inspect hidden spaces, clean and disinfect surfaces, and keep mold from getting comfortable. If the damage looks bigger than your weekend, call a water damage pro before your house starts growing its own ecosystem.