Water-damaged walls can feel like a disaster waiting to happen. If left untreated, they can lead to serious structural issues and mold growth. To tackle this problem effectively, you need to assess the damage, remove affected materials, and properly repair the wall. Each step is vital for a successful restoration, and knowing how to navigate them can save you from future headaches. Let’s break down these essential tips to get your walls back in shape.
Key Takeaways
- Identify the water source and assess the extent of damage before beginning repairs to prevent future issues.
- Remove any affected materials, including soggy drywall and wet insulation, while wearing protective gear.
- Ensure proper ventilation during the drying process to eliminate lingering moisture and prevent mold growth.
- Apply a moisture barrier and use mold-resistant paint to protect the walls from future water damage.
- Document all findings and repairs for reference, insurance claims, and future prevention strategies.
Assess the Extent of Damage
Before you start any repairs, it’s essential to assess the extent of the damage to your walls.
Begin by identifying the water source; is it a leaky roof, a burst pipe, or condensation? Understanding where the water’s coming from will help you prevent further issues.
Next, inspect your walls for signs of damage such as discoloration, bubbling paint, or mold growth. Use your hand to feel for soft spots or dampness. These indicators will guide your damage assessment, allowing you to determine whether it’s just cosmetic damage or if the underlying structure is compromised.
Don’t forget to check adjacent areas as moisture can spread. Document your findings with photos and notes; this will be invaluable for planning your repairs.
Taking the time to accurately assess the damage ensures you address all issues effectively, fostering a sense of belonging in your well-maintained home.
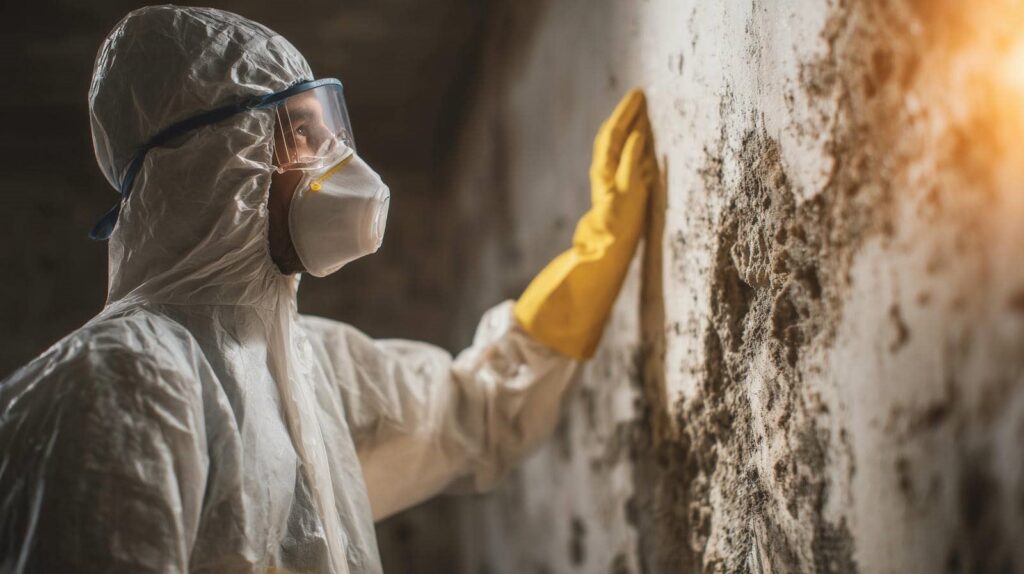
Remove Affected Materials
Start by carefully removing any affected materials from the damaged area. Wear protective gear, like gloves and a mask, to ensure your safety during the process.
Begin with drywall; cut out the soggy sections using a utility knife, making sure to check for any hidden mold. If you spot mold, prioritize mold removal to prevent it from spreading.
Next, inspect the insulation behind the walls. If it’s wet or compromised, you’ll need insulation replacement. Remove the old insulation and replace it with new, moisture-resistant material to keep your home safe and comfortable.
As you work, keep the area well-ventilated to help dry out any lingering moisture. Dispose of all removed materials properly, and consider consulting a professional if the damage seems extensive.
Taking these steps will protect your home and give you peace of mind, knowing you’re on the right track to recovery.
Repair and Restore the Wall
Once you’ve removed the damaged materials, it’s time to repair and restore the wall.
Begin by evaluating the surface for any remaining moisture or mold. If necessary, use wall restoration techniques like applying a moisture barrier or sealant to prevent future issues. For any holes or cracks, patch them with spackle or joint compound, then sand the area smooth once it’s dry.
Next, consider your paint selection options. Choose a mold-resistant paint for added protection, especially in humid areas. You might want to coordinate colors with your existing decor to create a harmonious space.
When painting, use quality brushes or rollers for a professional finish, and apply at least two coats for durability.
Finally, step back and admire your work. A well-restored wall enhances your home’s beauty and provides peace of mind, knowing you’ve tackled water damage head-on.
Frequently Asked Questions
How Can I Prevent Future Water Damage to My Walls?
To prevent future water damage, you should use waterproofing techniques like sealants and membranes. Additionally, implement effective drainage solutions around your property to redirect water away from your walls and maintain a dry environment.
Will Insurance Cover Water Damage Repairs?
Yes, many insurance policies cover water damage repairs, but it often depends on the cause. Isn’t it comforting to know you might have support? Check your policy details to confirm you’re adequately protected against future incidents.
What Signs Indicate Mold Growth After Water Damage?
You’ll notice signs like musty odors, discoloration on surfaces, and peeling paint, indicating mold growth. For effective mold identification, use moisture detection tools to pinpoint damp areas, ensuring a healthier environment for you and your loved ones.
How Long Does It Take for Walls to Dry Completely?
Your walls might feel like a soggy sponge, but they’ll typically dry completely in 3 to 7 days. Monitor the drying process with moisture measurement tools to ensure everything’s back to normal—no one wants a moldy reunion!
Can I Repair Water-Damaged Walls Myself, or Should I Hire a Professional?
You can tackle DIY repairs if you’re handy and confident, but hiring professional services ensures a thorough job. Consider your skills, time, and the extent of damage before deciding which path suits you best.
Review
In the battle against water-damaged walls, you’ve now equipped yourself with the knowledge to emerge victorious. By evaluating the damage, removing affected materials, and skillfully repairing the wall, you’re not just fixing a problem; you’re breathing new life into your space. Remember, each step you take is a brushstroke on the canvas of your home’s restoration. With diligence and care, you’ll turn that water-soaked wall into a demonstration of resilience and beauty.