You stop the water, you cut the power, and you protect the site before anything else. Then you call a flood cleanup pro, remove standing water fast, and sort what can still be restored. You dry every room, disinfect all surfaces, and strip out damaged drywall and flooring. After you repair structural damage, you’ll need one final step to keep mold from coming back—and that’s where the process gets critical.
Key Takeaways
- Shut off power and water, wear protective gear, and check for gas leaks before entering flooded areas.
- Document all damage with photos and notes, then call a flood cleanup professional for inspection.
- Remove standing water quickly using wet vacs or pumps, reaching hidden water under appliances and baseboards.
- Cut out soaked drywall, insulation, and flooring, then sort salvageable items from contaminated materials.
- Dry the structure completely with fans and dehumidifiers, replace damaged materials, and monitor for mold.
Stop the Water and Power
Before you enter the flooded area, shut off the main water supply and disconnect the power at the breaker if it’s safe to do so. You’ll protect your home and the crew helping you by stopping new water from entering the space.
Check other water sources, including irrigation lines, water heaters, and appliance feeds, then close each valve you can reach. If you smell gas or see damaged wiring, stay out and keep everyone away until the area is secured.
Wear insulated boots and gloves, and use a dry surface when you move near electrical equipment. These safety measures reduce shock, fire, and further flooding.
Once the utilities are isolated, you can assess the damage with your team and prepare for cleanup.
Call a Flood Cleanup Pro Early
As soon as you can safely enter the property, call a flood cleanup professional to inspect the damage and start the response plan. You’ll get professional assistance that helps you protect your space, document flood damage, and prioritize critical repairs before problems spread.
If you’re part of a community that values fast, coordinated recovery, this step keeps you connected to proven help.
- Verify hidden moisture with specialized meters
- Identify contaminated materials and safety risks
- Build a cleanup sequence that fits your site
A pro can coordinate with your insurer and guide you through decisions without guesswork. You don’t need to handle every technical detail alone; early expert support reduces delays, supports accurate claims, and gives you a clear path forward.
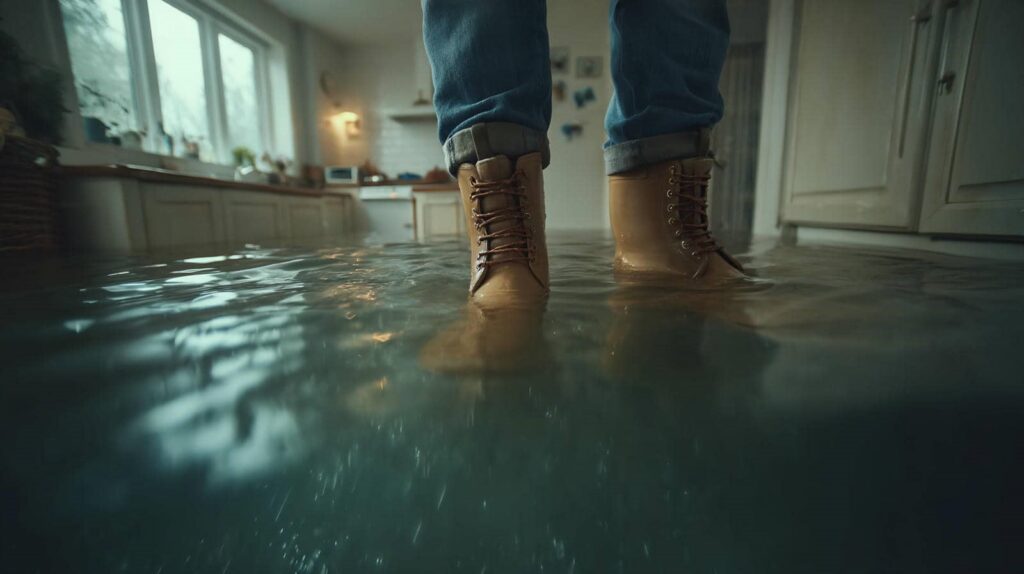
Remove Standing Water Fast
Once you’ve got a cleanup plan in place, remove standing water right away to limit structural damage and mold growth. You should shut off power to affected areas, then use water extraction methods that match the volume and depth of the flood.
For shallow water, a wet vac can help; for larger amounts, choose sump pump solutions or a submersible pump to speed the job. Keep hoses routed to a safe drain or exterior discharge point, and monitor flow so you don’t backfill the area.
Work in sections, starting with the lowest spots, and check hidden pockets under appliances and baseboards. When you act fast and work methodically, you protect your home and stay in control together.
Save What Can Still Be Restored
Start by sorting out the salvageable items so you can separate anything with a real chance of recovery from material that’s already beyond repair.
Check each item for structural damage, saturation level, and contamination before you decide what to keep.
When you compare restore vs. replace, you’ll save time and money by focusing only on items that can still meet safe, functional standards.
Salvageable Items First
Focus on salvageable items first so you can save what still has value and prevent further damage. Use item prioritization to separate goods by material, contamination level, and sentimental value.
Build an inventory checklist, then tag each item for salvage techniques and restoration methods. You’ll move faster, protect your crew, and keep your workspace organized.
- Photograph items for insurance claims.
- Perform material assessment on wood, metal, fabric, and electronics.
- Request professional evaluation for high-value pieces.
Work in small zones so you don’t spread moisture or mold. Bag loose parts, label everything, and record condition notes before cleaning.
If an item smells strongly of sewage, feels unstable, or shows structural failure, isolate it immediately. By focusing first on what’s recoverable, you strengthen recovery, reduce waste, and stay connected to your cleanup team.
Restore vs Replace
When you compare restore vs. replace, weigh repair cost, contamination, structural integrity, and long-term performance before you commit to either path.
You can often save cabinets, framing, and hard surfaces with proven restore techniques, but you should replace porous items that hold mold or sewage.
Check insurance coverage early, because it can shift replacement costs and reduce the emotional impact on your household.
For small losses, use DIY options if you can dry, clean, and disinfect safely.
For hidden damage, call professional services to test moisture, confirm stability, and set long term solutions.
Choose material choices with future floods in mind: closed-cell insulation, tile, or treated wood often outlast cheaper options.
That approach helps you protect your space, your team, and your budget.
Dry the Rooms Completely
First, remove any standing water with pumps, wet vacs, or mops so surfaces can start drying right away.
Then increase air circulation by opening windows, running fans, and using dehumidifiers to speed moisture removal.
You’ll need to keep air moving until walls, floors, and hidden spaces are completely dry.
Remove Standing Water
Pump out or mop up standing water immediately, then open windows and run fans or dehumidifiers to drive moisture out of the rooms. You’ll reduce standing water hazards and limit structural damage by acting fast with the right water extraction methods.
Check carpets, baseboards, and low spots so you don’t leave hidden puddles behind.
- Use a wet vac for deeper pools.
- Mop seams and corners after extraction.
- Remove soaked items that trap moisture.
Keep moving methodically through each room and inspect floors for slick spots, swelling, or discoloration.
If you’re part of a cleanup team, stay coordinated and document wet areas as you clear them. The goal is simple: eliminate every source of pooled water so the space can dry cleanly and stay safe for everyone on site.
Increase Air Circulation
Once the standing water is gone, increase airflow immediately to dry the rooms completely. Open windows and interior doors when outdoor air is dry, and run fans to push moist air out.
Use box fans, oscillating fans, and HVAC blowers to move air across floors, walls, and hidden corners. If you’ve got a dehumidifier, place it in the wettest room and empty it often.
These airflow techniques help limit mold growth and protect framing, drywall, and finishes. Keep ventilation strategies consistent day and night until surfaces feel dry and humidity drops.
Check closets, under sinks, and behind furniture, since trapped moisture lingers there. You’re not just drying a space—you’re restoring a safe, familiar home for everyone inside.
Check for Hidden Mold Growth
Even after visible water is gone, mold can spread in hidden areas within 24 to 48 hours. So inspect behind baseboards, under flooring, inside wall cavities, and around insulation. Use a flashlight and probe for soft spots, staining, or musty odor.
A thorough mold inspection helps you catch hidden mold before health risks grow and moisture control slips.
- Check framing, subfloors, and duct chases
- Log damp zones for targeted mold remediation
- Use containment strategies to protect air quality
If you find growth, stop spread fast and avoid disturbing it. Early mold prevention limits long term effects and reduces the need for aggressive surface treatment later.
Stay methodical, and you’ll keep your cleanup crew safer, faster, and more confident.
Clean and Disinfect All Surfaces
Start by washing every salvageable surface with clean water and a detergent to remove silt, residue, and organic debris. You’ll reduce contamination faster when you work from cleaner zones to dirtier ones and rinse tools often.
After washing, apply surface sanitization methods that match the material, then let the area dry fully before the next step. Use effective disinfecting agents labeled for flood cleanup, and follow the contact time exactly so the product can work.
Wear gloves, eye protection, and a fitted mask to protect yourself while you clean. Open windows and run fans if power is safe.
Keep your team coordinated, share supplies, and check each room twice. Consistent sanitation helps you restore a healthier space with confidence.
Remove Damaged Drywall and Flooring
Next, you should assess the structure for hidden damage before you remove any materials.
Cut out all wet drywall and flooring back to dry, intact edges to prevent trapped moisture and mold growth.
Then replace the removed sections with dry, code-compliant materials once the area is fully dry.
Assess Structural Damage
Once the area is dry and safe to enter, inspect the structure for hidden damage before you remove anything. You’ll protect your team and keep repairs focused.
Use a damage assessment to check for warped framing, soft subfloors, and stains that suggest moisture traveled farther than you can see. Pay close attention to foundation stability, especially near load-bearing walls and sill plates. If floors feel uneven or doors stick, note it and call a pro.
- Probe baseboards and trim for softness
- Look for separation at joints and corners
- Mark areas that feel spongy or shift
Document every finding with photos and notes. When you work this way, you’re part of a crew that fixes the right problems first and avoids costly surprises later.
Cut Out Wet Sections
Cut out any drywall, insulation, flooring, or trim that’s been soaked, swollen, or contaminated by floodwater. You’ll limit hidden moisture and improve mold prevention.
Use your damage assessment to mark all affected building materials, then remove them in clean sections with a utility knife or pry bar. Keep safety measures first: wear gloves, goggles, and a respirator, and shut off power in wet areas.
As you work, inspect insulation types for saturation and discard anything compressed or dirty. These restoration techniques help you control moisture management and expose framing for drying.
In DIY cleanup, stay organized, label cuts, and bag debris quickly so you don’t spread contamination. When you trim back wet sections, you protect your crew and set up a cleaner, stronger repair.
Replace With Dry Materials
After you’ve removed the soaked sections, replace them with dry, clean materials so the structure can dry out and be rebuilt correctly. You’ll help your home recover faster when you install new drywall, subflooring, and trim with tight seams and proper fasteners.
Use moisture barriers where water exposure could return, especially behind tubs, showers, and exterior walls. Match the replacement thickness to the original materials so finishes align and air gaps stay controlled.
- Check framing for hidden dampness before closing walls.
- Set dry materials only after humidity and readings drop.
- Seal edges and joints to reduce future intrusion.
When you work methodically, you protect the repair and stay part of a community that values safe, durable homes.
Repair Structural Damage
Before you rebuild, inspect the framing, subfloor, joists, and foundation for warping, cracking, rot, or movement, because hidden structural damage can compromise safety and worsen over time.
If you spot settlement or shifting, schedule a foundation inspection and document every defect. Replace compromised members with code-approved lumber, then secure connections with new fasteners, anchors, and straps.
For sagging beams, use beam reinforcement where an engineer approves added plates, sistering, or posts. Keep loads off damaged areas until repairs cure and hardware is tightened.
Check for uneven floors, sticking doors, and separating joints after each repair stage. You’re not fixing this alone; a careful, methodical approach helps your home stand strong again and keeps your crew confident as you move forward together.
Prevent Mold From Returning
To keep mold from returning, you need to dry the structure completely and control moisture sources right away. You should inspect hidden cavities, remove wet materials, and run dehumidifiers until readings stay stable.
Use mold prevention strategies that target leaks, poor airflow, and damp insulation so your crew can keep the space safe. Track indoor RH with humidity control techniques and keep it below 50%.
- Seal roof, pipe, and foundation leaks fast
- Ventilate bathrooms, kitchens, and crawl spaces
- Clean, dry, and monitor affected surfaces regularly
If you spot a musty odor or new staining, act fast and recheck the area. When you stay consistent, you protect your home and help everyone feel secure again.
Frequently Asked Questions
How Do I Document Flood Damage for Insurance Claims?
You document flood damage by taking dated photos and videos, listing affected items, and creating a damage assessment. Notify your flood insurance company quickly, keep receipts, and save repair estimates to support your claim.
Can I Safely Stay in My Home During Cleanup?
You can stay only if flood safety allows it: utilities are off, no structural damage exists, and you follow cleanup precautions. If you smell gas, see contamination, or feel unsure, leave and get professional help.
What Items Should Be Thrown Away Immediately After Flooding?
Throw away flooded items like mattresses, carpet, insulation, paper goods, and food immediately. Follow disposal guidelines for contaminated materials, especially porous items and anything touched by sewage, and you’ll protect your home and community.
How Long Does Flood Cleanup Usually Take?
Flood cleanup usually takes days to weeks, depending on flood duration factors, contamination, drying, and repairs. You’ll set cleanup timeline expectations by evaluating damage quickly, removing water, disinfecting surfaces, and coordinating trusted help.
Do I Need Permits for Flood Repair Work?
Yes, you often need permits for flood repair work. You should check flood repair regulations and start the permit application process early, because your local building department may require inspections, especially for structural, electrical, or plumbing repairs.
Summary
By following these flood cleanup steps, you’ll protect your home and speed recovery. If you stop water and power early, document damage, and bring in a pro, you’ll reduce hidden losses. Fast extraction, careful salvage, full drying, and disinfection help limit contamination. Remove unsalvageable materials, repair structural issues, and control moisture to keep mold from coming back. The theory that quick action always prevents major damage is mostly true, but only if you also verify what’s trapped inside walls.